Wednesday, February 10, 2010


3D Platforming
Today we continue working on our platform game. I want to reiterate a couple of criteria for your platforming.

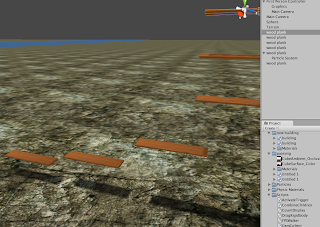
#1. Make sure you develop some kind of ladder, plank, or base to elevate your self.
#2. Unitize the jump button (space bar) to achieve more complex game play.
#3. Start your first person camera high up in the sky and work your way down-
#4. Use your rotate to add complexity to your platforming and to make your goal items stand out.
#5. Script: make sure you have "gem collect" on your First Person Controller, and make sure your goal items are tagged with "gem" and have collision detection.
Wednesday, February 3, 2010

Scripts

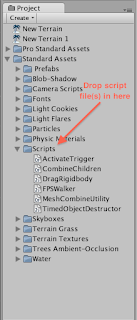
Scripts are basically files containing commands that tell Unity how certain objects should behave. One script you're familiar with already, is the one that allows us to walk around our game world in first person (the "FPSWalker" script). We are going to be using some other scripts as well that we will have to import, so that we could make our objects perform other actions, like rotate. To do this, we have to drag our script file into our 'Scripts' folder, that's inside our Standard Assets.

Now, to apply the script, either drag the script over to the object you want to attach it to, or select the object and go to "Component" > "Scripts" and select the script you want


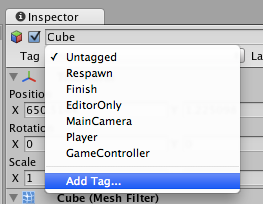
One of the scripts that we are going to be using is called 'GemCollect;' this script lets us collect items (or 'gems') throughout our game a'la pacman or super mario. You should all have this script already included in your Scripts folder, so using one of the methods described above, attach the "GemCollect" script to your 'First Person Controller', this tells Unity that your character is able to collect certain objects. Next, to specify which objects are the ones that we can collect, we have to tag them. First select the object that you want to be collectible, then in the 'Inspector', click on the Tag attribute, and select 'gem.' If the tag 'gem' isn't already included, we're going to have to add it by selecting 'Add Tag...'.


This will take us to the Tag Manager; there, we will have to add the tag 'gem' to the first unused 'Element' in the list.


Once you have that done, just go back to the object you want to be collected, and select 'gem' from the Tag menu as described above. Repeat this for all your collectible objects.

Monday, February 1, 2010

Unity pipe line!

I just want to go back and review some basics from last class :

The PIPELINE
Once you are done with your model...
- Go to "render" then "bake object," and check: Ambient Occlusion, illuminate and single texture.
- After your burn, double-click on your texture; what you will see is check marks in "ambient inclusion" and "illumination," but not in "color channel;" we need to reverse this.
- Open up "ambient" and "illumination," then go to "clear"
- Go to your desktop where C4d has placed all your textures for walls etc. They will be labeled and have two textures for each section. Open them up in Photoshop, Cut and paste one on top of another and go to"multiply," then save of the psd as "walls texture" etc. Repeat this until all your textures are done.

Go back to C4d; in the texture attributes, hit "color" and load up those textures for each wall, ceiling, etc.

Now we are ready to bring this into Unity!
Also, remember that "light maps" add directional light, and require a burnt light map to work; Go to "terrain" > "add light map"

MESH HAVE COLLIDERS:
Lets' make sure we're not just able to walk right through our models; go to: "Component" > "physics" > "mesh have coliders"

A quick overview of Unity:


Unity navigation:
Rotate, move and scale - very similar to cinema 4d, except you need to hold down "ALT" simultaneously for zooming in/out, and rotating the camera around the scene.


Layout screen:
We have two working areas
#1: all gray = working area
#2: all blue (below the gray) = game screen


Main Camera:
This is what should be in the middle of the sc reen-when you touch it you should have an axis-we call this now the "translate tool"-you mayemploy all move tools on this.

Inspector window:

Very similar to our attributes menu in C4d, touch anything in the translate menu and it's attributes will show up in the inspector to your right.


Terrain:
Go up to the top menu and click on terrain-go to "create terrain" then go to "terrain resolution" changes the resolution to 500m/500m square go to height map and change that to 30m.

Manipulating your terrain:

Go to Inspector window based on terrain and check out your options to move terrain-we have first the "raise height tool" - notice your various options for brush size etc.


Brush tool:

This is a way to add textures to your terrain. you also can use this to apply tress etc.
touch it and notice "edit texture" in the right corner-click on that then touch the triangle to it's right to get all the textures available to you.

all your textures and assets will be in the bottom right next to game window-we call this our "toy box'-please save a version of your project into "Assets" and you will see it show up in you "TB"


Trees:
When adding trees, don'tforget the bend factor; you can get trees the same way as getting textures.


Lighting:
Go to "create other" and get "directional lighting" rotate it around to get your desired look-then go to "terrain" and then "render a light map" to secure your new lighting onto your land (remember-when you use light -make sure you always render a light map)


Sun:
"create other " and add "point light" - you are going to need to add a flare on this - try "sun" under flare in theinspector
window.

First person:
Delete your camera by holding down ctl and hitting delete
grab FP from TB and drop it onto your translate area. position it at 250/70/250 so itdrops into the center off our game.-Adjust speed and height in inspector.

Play game: press play in the game view-walk around (remember, you must stop game before making anychanges.)


Sky:
Go to "Render settings" click and let go-look to your right and find "Sky box" in your Inspector window.-click on that and grab a sky.


Water:
Go to "pro-standard assets" in your toy box-make sure you position your water right and make sure you set the scale value to 1000/1000 (depending on your space)


Particle systems:
Go to "Game object"-then "create other" then "Particle systems" look in the Inspector and see all the variables to control your PS-your going to mostly be concerned with upping the numbers on emitter 15/20 and emission 20/30 also try "world velocity" to give it a natural look